How to Install DLSS 5 in Second Life

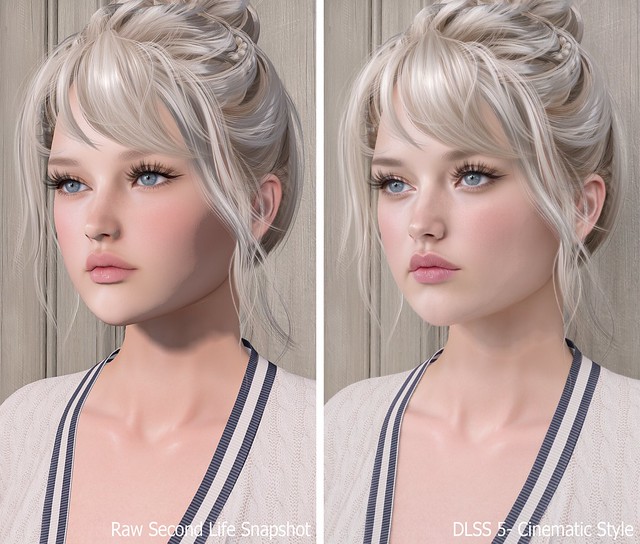
Previously, I shared my first DLSS 5 photo and promised I’d return with the full process, comparison photos, and everything I learned while getting it working in Second Life. What I expected to be a quick installation turned into a much deeper dive, but after plenty of reinstalling, troubleshooting, and comparing files, I finally found a setup that works for me.
DLSS stands for Deep Learning Super Sampling, an NVIDIA technology that uses AI to improve graphics. DLSS 5 goes beyond simply sharpening or upscaling the image by enhancing lighting, textures, materials, shadows, and small details in real time. The result still looks unmistakably like Second Life to me, only more polished and realistic.
The process may seem confusing at first, but once you have the correct files, installing it on another viewer should take about five minutes.
TL;DR: The Short Version
If you don’t want to read this entire post, here’s the condensed version:
- Make a separate copy of Firestorm.
- Download DLSS 5 Swapper v2.2.7 from GitHub.
- Add Firestorm-Releasex64.exe, or the executable for your preferred viewer, and select OpenGL, ReShade (default) and DLSS5-Feeder (No DLSS / Incompatible DLSS).
- Let DLSS 5 Swapper install the required files.
- Replace the renodx-dlss5.addon64 with the older file posted by Krish as v4.55 in the official RenoDX Discord. It appears as approximately 1.61 MB in Windows or 1.62 MB in Discord.
- Launch Firestorm and check ReShade’s Add-ons tab for DLSS 5 Feed 0.15.1 and DLSS 5 Neural Rendering.
- Press F6 to turn neural rendering on or off.
If the optional Swapper controls say NOT CONNECTED, DLSS 5 may still be working.
The Videos That Helped Me Find the Answer
FlutterWonder’s DLSS 5 video led me to the solution. I reached out in Second Life and learned that the older renodx-dlss5.addon64 file was the missing piece. Thank you, Flutter!
I also found Athena Felicci’s DLSS 5 video. Athena has a Discord with instructions for another method. I haven’t tried it, but it appears to work for other residents.

How to Install DLSS 5 in Second Life
Step 1: Make a Separate Firestorm Installation
Copy your Firestorm folder and give the copy a different name. This lets you install ReShade, replace files and troubleshoot without risking your main viewer. Once everything works, keep a backup of the entire folder because newer experimental files may not work as well with Second Life.
Step 2: Add Firestorm to DLSS 5 Swapper
Open DLSS 5 Swapper, add a new game or installation, and select Firestorm-Releasex64.exe from the copied Firestorm folder. Be sure you modify and launch the same installation.
Use these settings:
- Rendering API: OpenGL
- Rendering backend: ReShade (default)
- Installation route: DLSS5-Feeder (No DLSS / Incompatible DLSS)
Let the installation finish, then check the Firestorm folder for reshade-shaders and the required .addon64 files.
Step 3: Replace the RenoDX File With the Working Version
Join the official RenoDX Discord, open the #dlss5 channel, and check the Pinned Messages for the renodx-dlss5.addon64 file posted by Krish as v4.55. Discord displays the file as approximately 1.62 MB, while Windows displays it as approximately 1.61 MB.
Close Firestorm, open its installation folder, and overwrite the existing renodx-dlss5.addon64 with the older working version.
Step 4: Launch Firestorm and Check the ReShade Add-ons
Launch the Firestorm installation you modified, open ReShade with the Home key, and select Add-ons. My installation shows:
- DLSS 5 Feed 0.15.1
- DLSS 5 Swapper Overlay
- DLSS 5 Neural Rendering
DLSS 5 Feed and DLSS 5 Neural Rendering are the important ones. DLSS 5 Swapper Overlay is optional, so its absence doesn’t mean the installation failed.
My ReShade Tips
The default ReShade controls can be annoying in Second Life, so these small changes make the setup much easier to use.
- Change the ReShade overlay shortcut under Settings if you don’t want to use Home. I use the ~ key.
- Set Settings > General > Input Processing to Pass on all input so you can control Second Life while ReShade is open.
- Drag the top of the ReShade panel to move it anywhere on the screen.
- Press F6 to toggle DLSS 5 neural rendering on or off.
Important Notes Before You Try This
- This is an unofficial and experimental method.
- Use DLSS 5 in short bursts for photos or testing instead of leaving it running all day. My viewer eventually felt slower, and my graphics driver crashed.
- I tested this on Windows with an NVIDIA GeForce RTX 3090 Ti, not on a Mac.
- Other graphics cards, drivers and viewers may produce different results.
- Back up your viewer folder and working RenoDX file.
- Download executable add-ons carefully and only from sources you trust.
If you try it, let me know which viewer and graphics card you used and whether the older RenoDX file worked for you. This setup is changing quickly, so something that works today may behave differently after a future update.
Need Help with Installing DLSS 5 to Second Life Viewer?
Join the Second Life Cafe Discord, dlss5 channel if you need more help: https://discord.gg/cdKVGHmYjq. I will answer all of your questions there!